Back to article
3344
Product will not turn on
If your product appears to be receiving power but won't power on as expected:
Check if the battery is charged.
Be sure the battery is not depleted. For more info see, Checking the remaining battery charge and Charging your headphones.
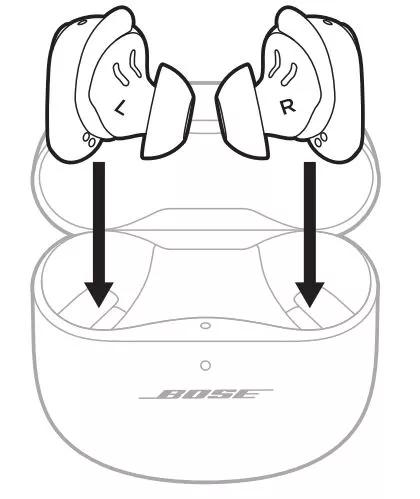
Make sure the stability band is aligned correctly so the earbud fits in the case correctly..
If the stability bands are not aligned correctly, it could prevent the earbuds from making a solid connection with the charging pins in the case.
Make sure to align the dots on the earbuds and the stability bands.
See Changing the stability bands for more information.
Make sure to align the dots on the earbuds and the stability bands.
See Changing the stability bands for more information.
Resync the earbud connection.
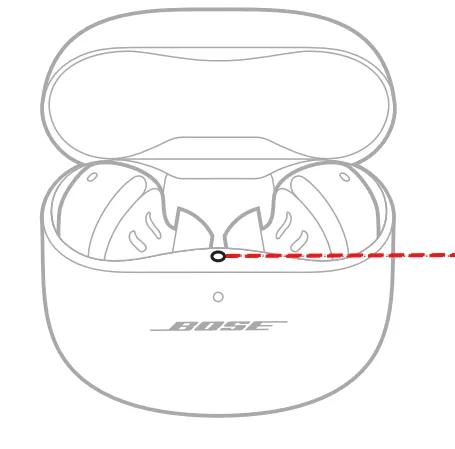
- Place both earbuds into the charging case. Keep the lid open. The earbud status light will illuminate when the earbuds are inserted into case. If the status light does not light up, press downward on the buds to ensure they are making a solid connection with the charging pins.
- Close the lid on the case.
- When the status light on the front of the case stops flashing, open the lid, remove just the right earbud, and place it into your right ear.
You should hear the welcome tone. - Place the left earbud in your ear. You should hear the welcome tone and can continue using your product.
If your product has been in extreme hot or cold temperature, wait until it reaches room temperature.
If the battery temperature is beyond the operating temperature range, wait until the product reaches room temperature, then try again.
Make sure the earbuds are not in standby mode.
Standby conserves the earbud battery when the earbuds are out of the case and not in use. The earbuds switch to standby when you remove both earbuds from your ears for 20 minutes. To wake the earbuds, insert both earbuds in your ears or use the Bose app.
The charging case may need more time to charge before the LEDs turn on.
If the charging case has been fully depleted, it may take 30 minutes for the LEDs to turn on when charging the case.
Check for and install any available product updates.
On a computer, visit btu.bose.com and follow the instructions to ensure your product has the latest features and enhancements. See Updating the software or firmware of your product.
Reset your product.
Much like rebooting a smartphone, your product might need to be reset on occasion to correct minor issues. For more info, see Resetting your product.
Check that the USB charger meets the power requirement of your product.
On the USB charger, there will be text that indicates the amp (A) or milliamp (mA) rating of the charger. This rating varies among chargers – including those supplied with different models of Bose products. The closer the amp rating of the charger is to the maximum amp rating of the product, the more quickly the product will recharge. If the amp rating of the charger is too low, the product may recharge slowly or not at all. Refer to the specifications indicated on the product or within it's owner's guide on for details.
Some products require minimum of 1 amp of current in order to recharge. Many USB ports on a computers can only provide a maximum of 0.5 amps of current. Be sure to use a safety-agency-approved power supply that meets local regulatory requirements (e.g. UL, CSA, VDE, CCC).
Some products require minimum of 1 amp of current in order to recharge. Many USB ports on a computers can only provide a maximum of 0.5 amps of current. Be sure to use a safety-agency-approved power supply that meets local regulatory requirements (e.g. UL, CSA, VDE, CCC).
Try a different charger.
Charge times can vary based on the charger. Chargers with a higher current rating generally charge products faster than those with a lower rating. Chargers typically list a current rating on the label in amps (A) or milliamps (mA). A current rating of 1 A / 1000 mA or higher is recommended.
Your product may need service.
If the steps provided do not resolve your issue, your product may need service. Follow the link below for more information on how to service your product. Depending on your product and region, you will be provided a contact number or the ability to setup service online.
Click here to start service
Click here to start service
Was this article helpful?
Thank you for your feedback!